Lesson 1.What is Web API?
The ASP.NET Web API is an extensible framework for building HTTP based services that can be accessed in different applications on different platforms such as web, windows, mobile, etc. It works more or less the same way as ASP.NET MVC web application except that it sends data as a response instead of Html view. It is like a web service or WCF service but the exception is that it only supports HTTP protocol.
- ASP.NET Web API is an ideal platform for building RESTful services.
- ASP.NET Web API is built on top of ASP.NET and supports ASP.NET request/response pipeline
- ASP.NET Web API maps HTTP verbs to method names.
- ASP.NET Web API supports different formats of response data. Built-in support for JSON, XML, BSON format.
- ASP.NET Web API can be hosted in IIS, Self-hosted, or other web servers that support .NET 4.0+.
- ASP.NET Web API framework includes a new HttpClient to communicate with the Web API server. HttpClient can be used in ASP.MVC server side, Windows Form application, Console application, or other apps.
ASP.NET Web API Versions
| Web API Version | Supported .NET Framework | Coincides with | Supported in |
|---|---|---|---|
| Web API 1.0 | .NET Framework 4.0 | ASP.NET MVC 4 | VS 2010 |
| Web API 2 - Current | .NET Framework 4.5 | ASP.NET MVC 5 | VS 2012, 2013 |
ASP.NET Web API vs WCF
| Web API | WCF |
|---|---|
| Open source and ships with .NET framework. | Ships with .NET framework |
| Supports only HTTP protocol. | Supports HTTP, TCP, UDP and custom transport protocol. |
| Maps http verbs to methods | Uses attributes based programming model. |
| Uses routing and controller concept similar to ASP.NET MVC. | Uses Service, Operation and Data contracts. |
| Does not support Reliable Messaging and transaction. | Supports Reliable Messaging and Transactions. |
| Web API can be configured using HttpConfiguration class but not in web.config. | Uses web.config and attributes to configure a service. |
| Ideal for building RESTful services. | Supports RESTful services but with limitations. |
When to choose WCF?
- Choose WCF if you use .NET Framework 3.5. Web API does not support .NET 3.5 or below.
- Choose WCF if your service needs to support multiple protocols such as HTTP, TCP, Named pipe.
- Choose WCF if you want to build a service with WS-* standards like Reliable Messaging, Transactions, Message Security.
- Choose WCF if you want to use Request-Reply, One Way, and Duplex message exchange patterns.
When to choose ASP.NET Web API?
- Choose Web API if you are using .NET Framework 4.0 or above.
- Choose Web API if you want to build a service that supports only HTTP protocol.
- Choose Web API to build RESTful HTTP based services.
- Choose Web API if you are familiar with ASP.NET MVC.
Here, you will learn how to create a new ASP.NET Web API project using Visual Studio.
You can create a Web API project in two ways.
- Web API with MVC Project
- Stand-alone Web API Project
Web API with MVC Project
Visual Studio (2013/2015/2017) includes a Web API template which creates a new Web API project with ASP.NET MVC application and includes all the necessary references to get started.
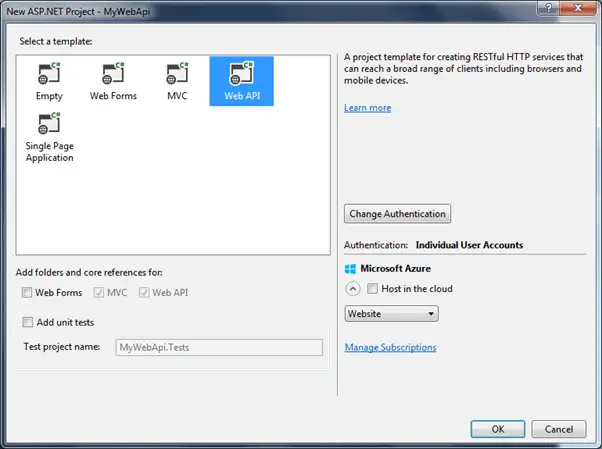
For this, open Visual Studio and click on the File menu and click on New Project. This will open the New Project popup as below.

In the New Project popup, expand Visual C# and select Web node in the left pane. Select ASP.NET Web Application template in the middle pane and enter the name of a project and click OK. (ASP.NET Web Application (.NET Framework) template in Visual Studio 2017.)

This project is the same as the default MVC project with two specific files for Web API, WebApiConfig.cs in App_Start folder and ValuesController.cs in Controllers folder as shown below.
The WebApiConfig.cs is a configuration file for Web API. You can configure routes and other things for web API, same like RouteConfig.cs is used to configure MVC routes. It also creates Web API controller ValuesController.cs by default. You will learn about WebApiConfig and Controller in the next section.
Thus, you can create a Web API project with MVC to get started on your application.
Stand-alone Web API Project
Here, we will create a new stand-alone Web API project without an MVC project.
For this, open Visual Studio 2013 for Web -> go to the File menu and select New Project. This will open the New Project popup as below.

Select Web template in the left pane and ASP.NET Web Application in the middle pane. Enter the name of the project, location, and Solution name as shown above. Clicking on OK will open a popup as shown below.
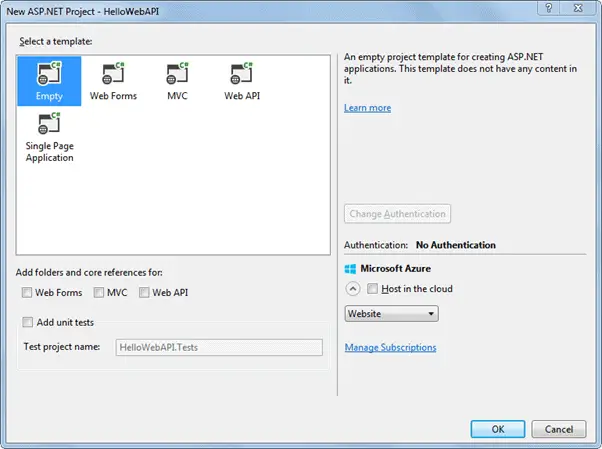
In the above popup, select Empty as a template and click ok. This will create an empty "HelloWebAPI" project.
Now, we need to add latest Web API references using NuGet Package Manager. Right Click on the project and click Manage NuGet Packages.. as shown below.

This will open Manage NuGet Packages popup. Select Online in the left pane and search for webapi (make sure that internet connection is on). This will display all the Web API related packages. Select Microsoft ASP.NET Web API2.2 package and click on Install as shown below.
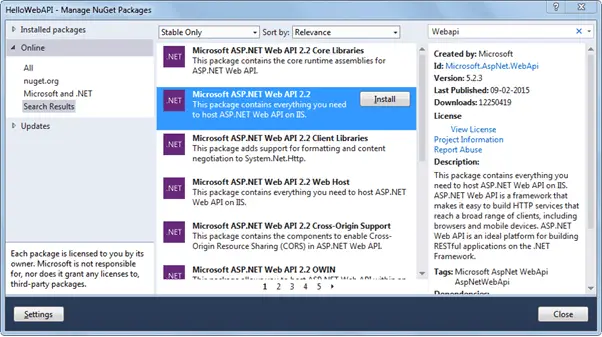
Accept the license agreement and continue.
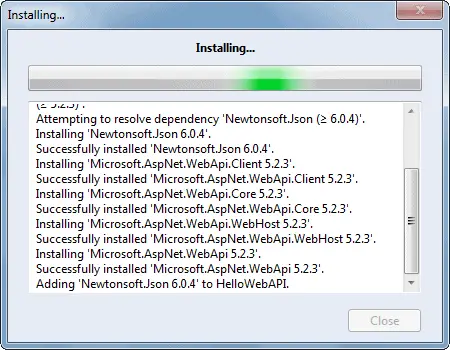
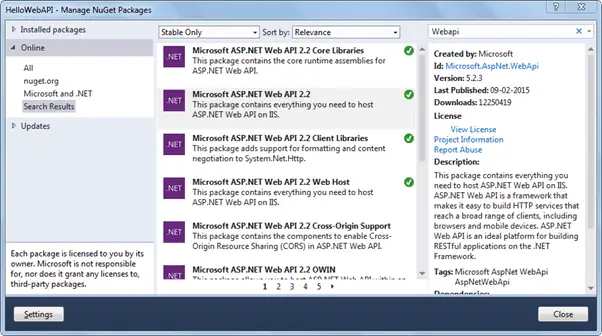
The following Web API packages are displayed upon successful installation.
Now, create the Controllers and Configuration folder in the HelloWebAPI project as shown below. We will add the Web API controller in the Controllers folder and the configuration class in the Configuration folder.

Now, add a new class in the configuration folder and name it "HelloWebAPIConfig" with the following content. (You may give an appropriate name)
using System;
using System.Collections.Generic;
using System.Linq;
using System.Web;
using System.Web.Http;

namespace HelloWebAPI.Configuration
{
    public static class HelloWebAPIConfig
    {
        public static void Register(HttpConfiguration config)
        {
            // Web API routes
            config.MapHttpAttributeRoutes();

            config.Routes.MapHttpRoute(
                name: "DefaultApi",
                routeTemplate: "api/{controller}/{id}",
                defaults: new { id = RouteParameter.Optional }
            );
        }
    }
}
Now, add Global.asax by right clicking on the project -> select Add -> click New Item.. to open Add New Item popup as below. Select Global Application Class and click OK.

This will add Global.asax file into the project. We need to configure our Web API routes when application starts. So call HelloWebAPIConfig.Register() method in the Application_Start event in the Global.asax as shown below.
public class Global : System.Web.HttpApplication
{
    protected void Application_Start(object sender, EventArgs e)
    {
        GlobalConfiguration.Configure(HelloWebAPIConfig.Register);
    }
}
Web API is configured only using code based configuration using GlobalConfiguration class. The Configure() method requires a callback method where you have configured your Web API.
Thus, when application starts it will call Application_Start event which in turn calls HelloWebAPIConfig.Register() method to configure your Web API.
Now, let's add Web API controller by right clicking on the Controllers folder -> select Controller.. this will open popup as below.
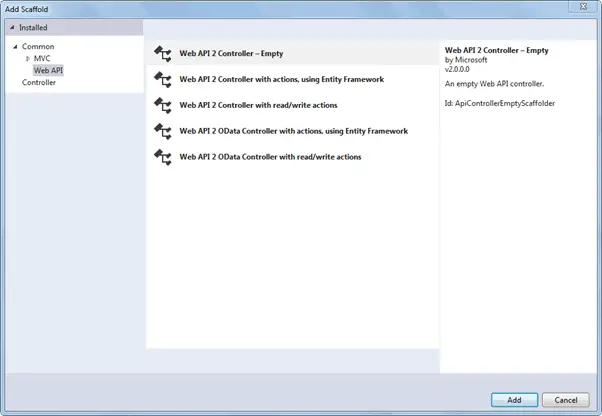
Select Web API in the left pane and Web API 2 Controller - Empty in the middle pane and click Add. This will open another popup to enter a name of your controller as below. Enter controller name and click Add.

This will create following empty HelloController class in Controllers folder.
using System;
using System.Collections.Generic;
using System.Linq;
using System.Net;
using System.Net.Http;
using System.Web.Http;

namespace HelloWebAPI.Controller
{
    public class HelloController : ApiController
    {

    }
}
Now, we need to add action methods. Here, we will add simple Get action methods as shown below.
using System;
using System.Collections.Generic;
using System.Linq;
using System.Net;
using System.Net.Http;
using System.Web.Http;

namespace HelloWebAPI.Controller
{
    public class HelloController : ApiController
    {
        public string Get()
        {
            return "Hello World";
        }
    }
}
Now, compile and run the project and navigate to http://localhost:xxxx/api/hello in the browser. It will display following result. (replace xxxx with your local port number)

So in this way you can create a simple Web API from scratch with config and controller class.
Fiddler
Fiddler is a free debugging proxy for any browser. We can use it to compose and execute different HTTP requests to our Web API and check HTTP response.
Let's see how to use Fiddler to send an HTTP request to our local Web API and check the response.
Step 1:
Download and install Fiddler from here.
Step 2:
After successful installation click on Fiddler.exe to open Fiddler. It will look like the image below.
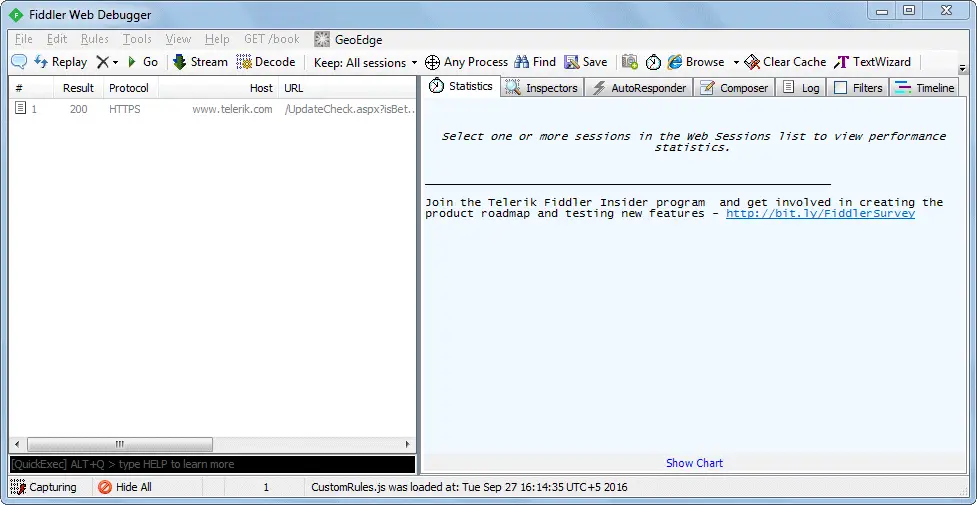
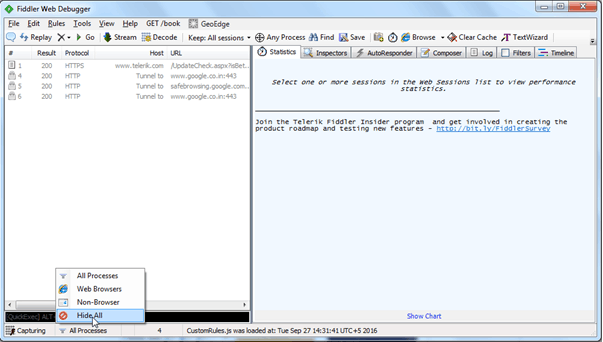
Fiddler by default captures all processes. We are only interested in intercepting our local process. So click on All Processes at the bottom left corner and select Hide All.
Step 3:
Click on Composer tab. First tab in the Composer tab is Parsed tab where we can configure HTTP requests and execute it. The first dropdown includes all HTTP Methods. Select a particular HTTP method for the request you want to execute. Here, we will select GET to execute HTTP GET request as shown below.
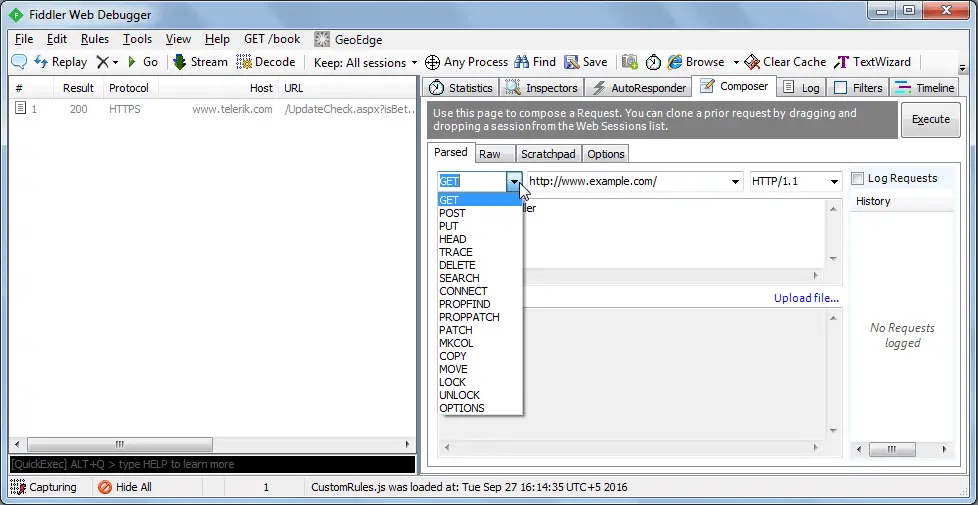
Now, enter a URL of a request in the adjacent textbox. Here, we will execute HTTP request http://localhost:xxxx/api/values to the Web API which we created in the previous section as shown below.
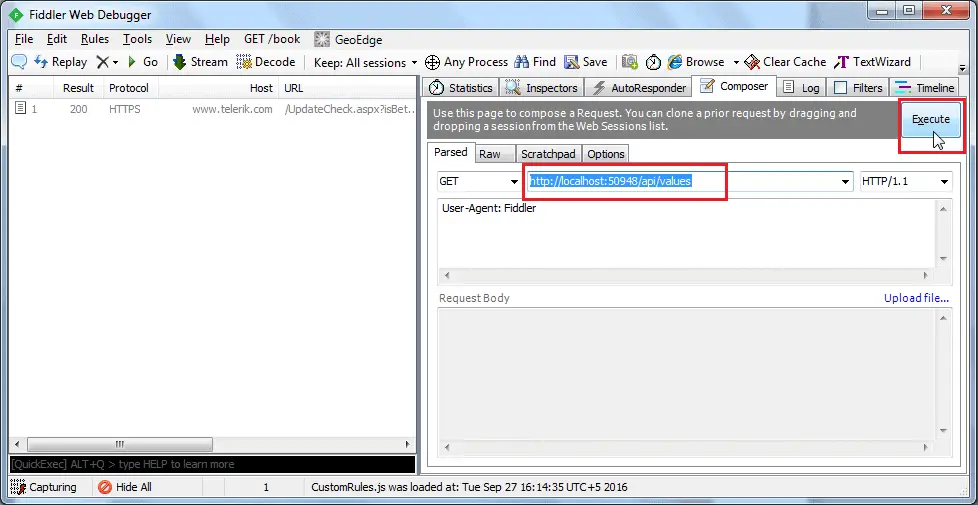
Click on the Execute button to send this HTTP request and it will immediately display the response in the left pane as shown below.
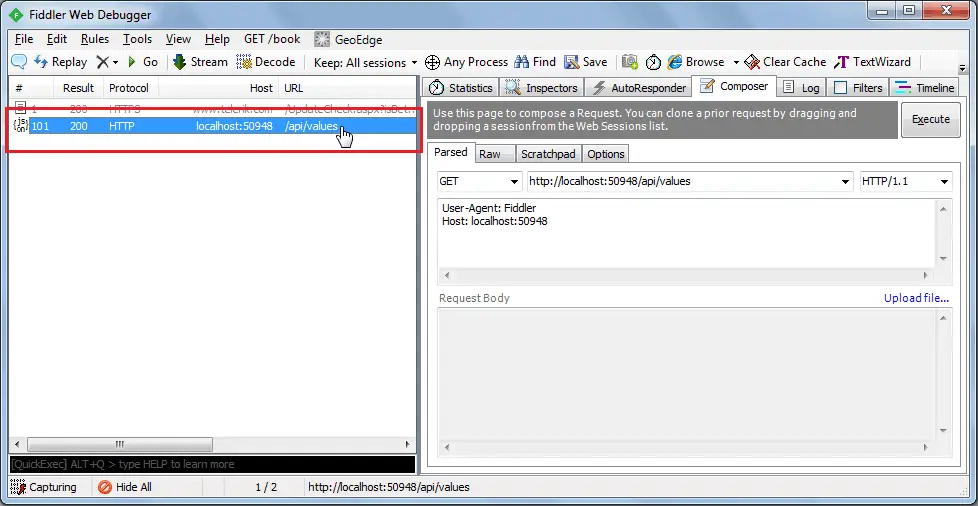
Double click on the result row above to open Inspector tab for the request as shown below.
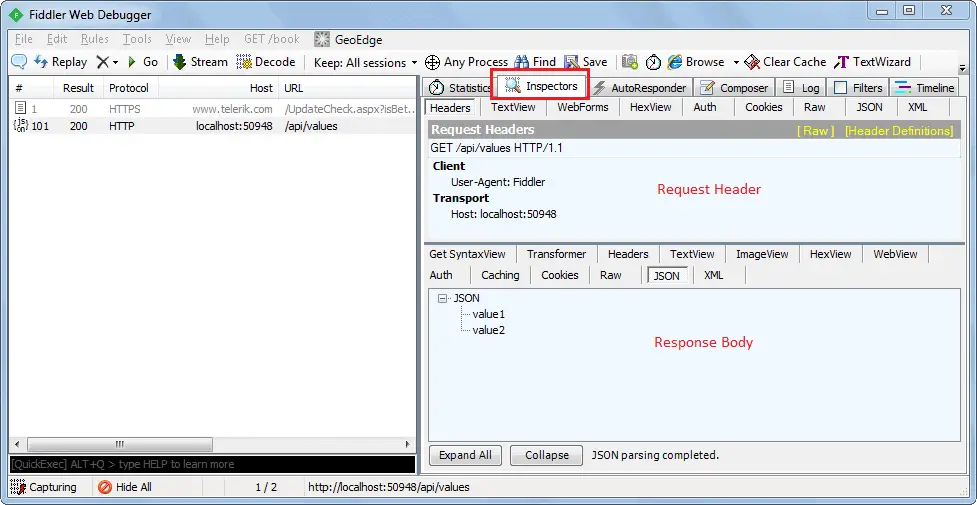
As you can see above, the top pane shows the Request header and the bottom pane shows the response.
You can also see the raw request header and response by clicking on the Raw tab of request and response as shown below.
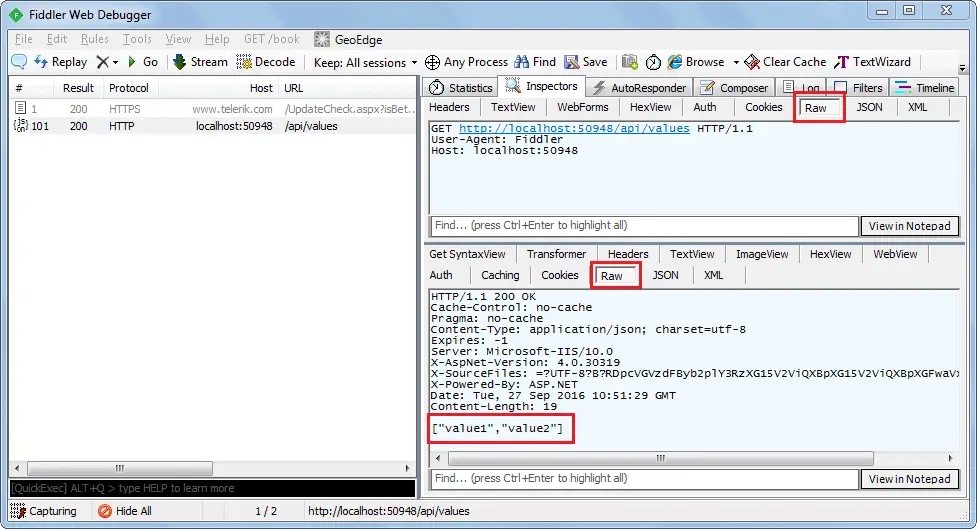
You can also see other form of request and response in Fiddler but this is the basic way of executing an HTTP request and checking the response.
Postman
Postman is a free API debugging tool. You can install it on your Chrome browser or Mac. Install it for Chrome from here.
After successful installation, open it and select HTTP Method and enter the URL of your Web API as shown below.
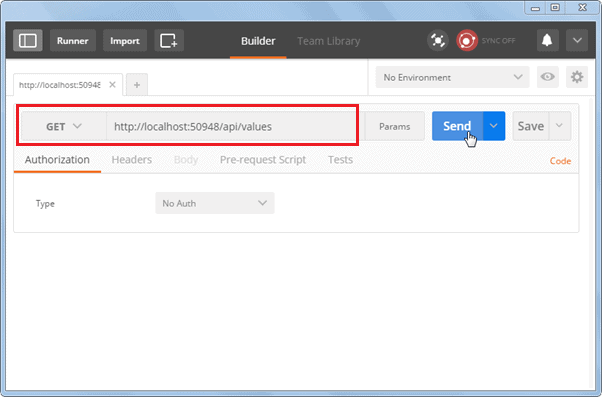
Click on the Send button to send an HTTP request to the provided URL. The response is displayed below.
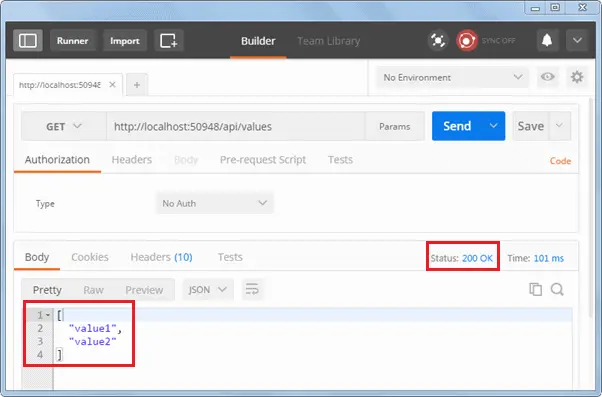
As you can see above, HTTP response shows data and response status. Thus, you can use Postman to test your Web API.
We will use Fiddler throughout this tutorial series.
Lesson 4. Web API Controller
We created Web API with MVC project in the previous section where it generated a simple controller. Here, you will learn about Web API Controller in detail.
Web API Controller is similar to ASP.NET MVC controller. It handles incoming HTTP requests and send response back to the caller.
Web API controller is a class which can be created under the Controllers folder or any other folder under your project's root folder. The name of a controller class must end with "Controller" and it must be derived from System.Web.Http.ApiController class. All the public methods of the controller are called action methods.
The following is a simple controller class added by visual studio by default when we created a new Web API project in the Create Web API Project section.
using System;
using System.Collections.Generic;
using System.Linq;
using System.Net;
using System.Net.Http;
using System.Web.Http;

namespace MyWebAPI.Controllers
{
    public class ValuesController : ApiController
    {
        // GET: api/values
        public IEnumerable<string> Get()
        {
            return new string[] { "value1", "value2" };
        }

        // GET: api/values/5
        public string Get(int id)
        {
            return "value";
        }

        // POST: api/values
        public void Post([FromBody]string value)
        {
        }

        // PUT: api/values/5
        public void Put(int id, [FromBody]string value)
        {
        }

        // DELETE: api/values/5
        public void Delete(int id)
        {
        }
    }
}
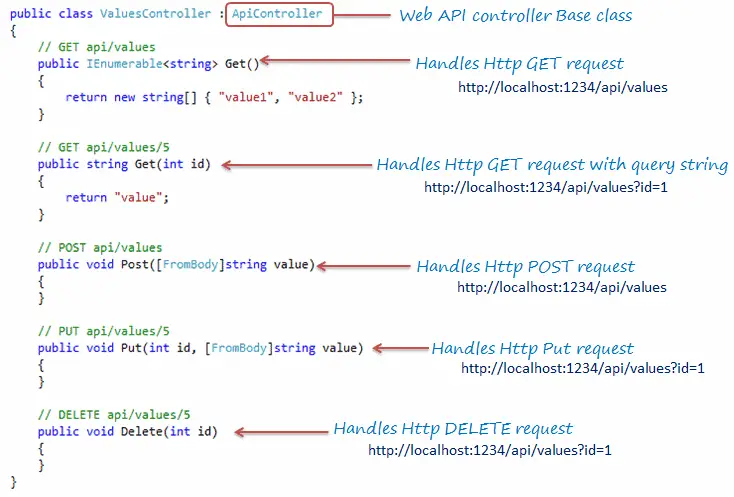
As you can see in the above example, ValuesController class is derived from ApiController and includes multiple action methods whose names match with HTTP verbs like Get, Post, Put and Delete.
Based on the incoming request URL and HTTP verb (GET/POST/PUT/PATCH/DELETE), Web API decides which Web API controller and action method to execute e.g. Get() method will handle HTTP GET request, Post() method will handle HTTP POST request, Put() mehtod will handle HTTP PUT request and Delete() method will handle HTTP DELETE request for the above Web API.
The following figure illustrates the significance of Web API controller and action methods.
using System;
using System.Collections.Generic;
using System.Linq;
using System.Net;
using System.Net.Http;
using System.Web.Http;

namespace MyWebAPI.Controllers
{
    public class ValuesController : ApiController
    {
        [HttpGet]
        public IEnumerable<string> Values()
        {
            return new string[] { "value1", "value2" };
        }

        [HttpGet]
        public string Value(int id)
        {
            return "value";
        }

        [HttpPost]
        public void SaveNewValue([FromBody]string value)
        {
        }

        [HttpPut]
        public void UpdateValue(int id, [FromBody]string value)
        {
        }

        [HttpDelete]
        public void RemoveValue(int id)
        {
        }
    }
}
Web API Controller Characteristics
- It must be derived from
System.Web.Http.ApiControllerclass. - It can be created under any folder in the project's root folder. However, it is recommended to create controller classes in the Controllers folder as per the convention.
- Action method name can be the same as HTTP verb name or it can start with HTTP verb with any suffix (case in-sensitive) or you can apply Http verb attributes to method.
- Return type of an action method can be any primitive or complex type.
Action Method Naming Conventions
As mentioned above, name of the action methods in the Web API controller plays an important role. Action method name can be the same as HTTP verbs like Get, Post, Put, Patch or Delete as shown in the Web API Controller example above. However, you can append any suffix with HTTP verbs for more readability. For example, Get method can be GetAllNames(), GetStudents() or any other name which starts with Get.
The following table lists possible action method names for each HTTP method:
| HTTP Method | Possible Web API Action Method Name | Usage |
|---|---|---|
| GET | Get() get() GET() GetAllStudent() *any name starting with Get * | Retrieves data. |
| POST | Post() post() POST() PostNewStudent() *any name starting with Post* | Inserts new record. |
| PUT | Put() put() PUT() PutStudent() *any name starting with Put* | Updates existing record. |
| PATCH | Patch() patch() PATCH() PatchStudent() *any name starting with Patch* | Updates record partially. |
| DELETE | Delete() delete() DELETE() DeleteStudent() *any name starting with Delete* | Deletes record. |
The following figure illustrates the overall request/response pipeline.

Visit Web API HTTP Message Life Cycle Poster for more details.
| Web API Controller | MVC Controller |
|---|---|
| Derives from System.Web.Http.ApiController class | Derives from System.Web.Mvc.Controller class. |
| Method name must start with Http verbs otherwise apply http verbs attribute. | Must apply appropriate Http verbs attribute. |
| Specialized in returning data. | Specialized in rendering view. |
| Return data automatically formatted based on Accept-Type header attribute. Default to json or xml. | Returns ActionResult or any derived type. |
| Requires .NET 4.0 or above | Requires .NET 3.5 or above |
public class WebAPIApplication : System.Web.HttpApplication
{
    protected void Application_Start()
    {
        GlobalConfiguration.Configure(WebApiConfig.Register);

        //other configuration
    }
}
public static class WebApiConfig
{
    public static void Register(HttpConfiguration config)
    {

        config.MapHttpAttributeRoutes();

        config.Routes.MapHttpRoute(
            name: "DefaultApi",
            routeTemplate: "api/{controller}/{id}",
            defaults: new { id = RouteParameter.Optional }
        );

        // configure additional webapi settings here..
    }
}GlobalConfiguration.Configure(WebApiConfig.Register) in the Application_Start method.WebApiConfig.Register() the method includes a parameter of HttpConfiguration the type which is then used to configure the Web API.HttpConfiguration is the main class which includes the following properties using which you can override the default behavior of Web API.| Property | Description |
|---|---|
| DependencyResolver | Gets or sets the dependency resolver for dependency injection. |
| Filters | Gets or sets the filters. |
| Formatters | Gets or sets the media-type formatters. |
| IncludeErrorDetailPolicy | Gets or sets a value indicating whether error details should be included in error messages. |
| MessageHandlers | Gets or sets the message handlers. |
| ParameterBindingRules | Gets the collection of rules for how parameters should be bound. |
| Properties | Gets the properties associated with this Web API instance. |
| Routes | Gets the collection of routes configured for the Web API. |
| Services | Gets the Web API services. |
Lesson 6. Web API Routing
In the previous section, we learned that Web API can be configured in WebApiConfig class. Here, we will learn how to configure Web API routes.
Web API routing is similar to ASP.NET MVC Routing. It routes an incoming HTTP request to a particular action method on a Web API controller.
Web API supports two types of routing:
- Convention-based Routing
- Attribute Routing
Convention-based Routing
public static class WebApiConfig
{
    public static void Register(HttpConfiguration config)
    {
        // Enable attribute routing
        config.MapHttpAttributeRoutes();

        // Add default route using convention-based routing
        config.Routes.MapHttpRoute(
            name: "DefaultApi",
            routeTemplate: "api/{controller}/{id}",
            defaults: new { id = RouteParameter.Optional }
        );
    }
}public static class WebApiConfig
{
public static void Register(HttpConfiguration config)
{
config.MapHttpAttributeRoutes();
// define route
IHttpRoute defaultRoute = config.Routes.CreateRoute("api/{controller}/{id}",
new { id = RouteParameter.Optional }, null);
// Add route
config.Routes.Add("DefaultApi", defaultRoute);
}
}The following table lists the parameters of the MapHttpRoute() method.
| Parameter | Description |
|---|---|
| name | Name of the route |
| routeTemplate | URL pattern of the route |
| defaults | An object parameter that includes default route values |
| constraints | Regex expression to specify characteristic of route values |
| handler | The handler to which the request will be dispatched. |
Now, let's see how Web API handles an incoming http request and sends the response.
The following is a sample HTTP GET request.
GET http://localhost:1234/api/values/ HTTP/1.1
User-Agent: Fiddler
Host: localhost: 60464
Content-Type: application/json
Considering the DefaultApi route configured in the above WebApiConfig class, the above request will execute Get() action method of the ValuesController because HTTP method is a GET and URL is http://localhost:1234/api/values which matches with DefaultApi's route template /api/{controller}/{id} where value of {controller} will be ValuesController. Default route has specified id as an optional parameter so if an id is not present in the url then {id} will be ignored. The request's HTTP method is GET so it will execute Get() action method of ValueController.
If Web API framework does not find matched routes for an incoming request then it will send 404 error response.
The following figure illustrates Web API Routing.
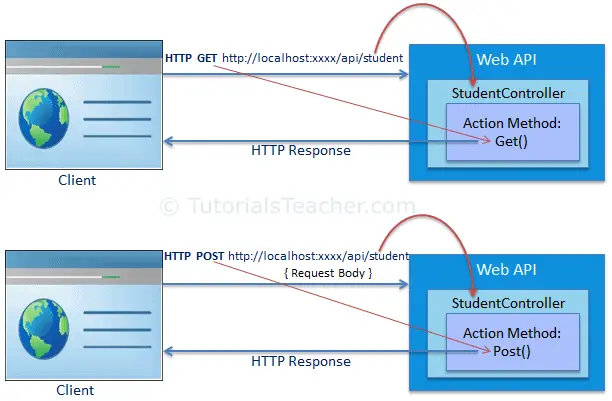
The following table displays which action method and controller will be executed on different incoming requests.
| Request URL | Request HTTP Method | Action method | Controller |
|---|---|---|---|
http://localhost:1234/api/course | GET | Get() | CourseController |
http://localhost:1234/api/product | POST | Post() | ProductController |
http://localhost:1234/api/teacher | PUT | Put() | TeacherController |
Configure Multiple Routes
We configured a single route above. However, you can configure multiple routes in the Web API using the HttpConfiguration object. The following example demonstrates configuring multiple routes.
public static class WebApiConfig
{
                public static void Register(HttpConfiguration config)
    {
        config.MapHttpAttributeRoutes();

                // school route
        config.Routes.MapHttpRoute(
            name: "School",
            routeTemplate: "api/myschool/{id}",
            defaults: new { controller="school", id = RouteParameter.Optional }
            constraints: new { id ="/d+" }
        );

                // default route
        config.Routes.MapHttpRoute(
            name: "DefaultApi",
            routeTemplate: "api/{controller}/{id}",
            defaults: new { id = RouteParameter.Optional }
        );
    }
}
In the above example, School route is configured before DefaultApi route. So any incoming request will be matched with the School route first and if incoming request url does not match with it then only it will be matched with DefaultApi route. For example, request url is http://localhost:1234/api/myschool is matched with School route template, so it will be handled by SchoolController.
Attribute Routing
Attribute routing is supported in Web API 2. As the name implies, attribute routing uses [Route()] attribute to define routes. The Route attribute can be applied on any controller or action method.
In order to use attribute routing with Web API, it must be enabled in WebApiConfig by calling config.MapHttpAttributeRoutes() method.
Consider the following example of attribute routing.
public class StudentController : ApiController
{
    [Route("api/student/names")]
                public IEnumerable<string> Get()
    {
                return new string[] { "student1", "student2" };
    }
}
In the above example, the Route attribute defines new route "api/student/names" which will be handled by the Get() action method of StudentController. Thus, an HTTP GET request http://localhost:1234/api/student/names will return list of student names.
Lesson 7. Parameter Binding
The following table lists the default rules for parameter binding.
| HTTP Method | Query String | Request Body |
|---|---|---|
| GET | Primitive Type, Complex Type | NA |
| POST | Primitive Type | Complex Type |
| PUT | Primitive Type | Complex Type |
| PATCH | Primitive Type | Complex Type |
| DELETE | Primitive Type, Complex Type | NA |
Let's see how Web API get values of action method parameters from HTTP request.
Get Action Method with Primitive Parameter
Consider the following example of Get action method that includes single primitive type parameter.
public class StudentController : ApiController
{
    public Student Get(int id)
    {

    }
}
As you can see above Get action method includes id parameter of int type. So, Web API will try to extract the value of id from the query string of requested URL, convert it into int and assign it to id parameter of Get action method. For example, if an HTTP request is http://localhost/api/student?id=1 then value of id parameter will be 1.
Followings are valid HTTP GET Requests for the above action method.
http://localhost/api/student?id=1
http://localhost/api/student?ID=1
Multiple Primitive Parameters
Consider the following example of Get action method with multiple primitive parameters.
public class StudentController : ApiController
{
    public Student Get(int id, string name)
    {

    }
}
As you can see above, Get method includes multiple primitive type parameters. So, Web API will try to extract the values from the query string of request URL. For example, if an HTTP request is http://localhost/api/student?id=1&name=steve then value of id parameter will be 1 and name will be "steve".
Followings are valid HTTP GET Requests for the above action method.
http://localhost/api/student?id=1&name=steve
http://localhost/api/student?ID=1&NAME=steve
http://localhost/api/student?name=steve&id=1
POST Action Method with Primitive Parameter
HTTP POST request is used to create new resource. It can include request data into HTTP request body and also in query string.
Consider the following Post action method.
public class StudentController : ApiController
{
    public Student Post(id id, string name)
    {

    }
}
As you can see above, Post() action method includes primitive type parameters id and name. So, by default, Web API will get values from the query string. For example, if an HTTP POST request is http://localhost/api/student?id=1&name=steve then the value of id will be 1 and name will be "steve" in the above Post() method.
Now, consider the following Post() method with complex type parameter.
public class Student
{
    public int Id { get; set; }
    public string Name { get; set; }
}

public class StudentController : ApiController
{
    public Student Post(Student stud)
    {

    }
}
The above Post() method includes Student type parameter. So, as a default rule, Web API will try to get the values of stud parameter from HTTP request body.
Following is a valid HTTP POST request in the fiddler for the above action method.
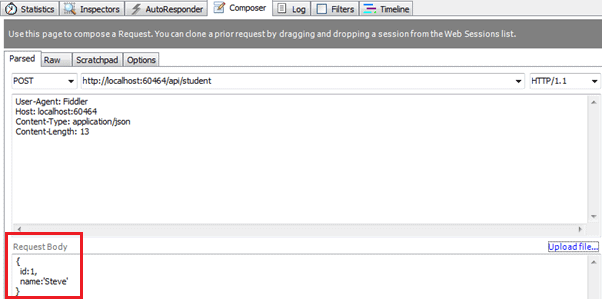
Web API will extract the JSON object from the Request body above and convert it into Student object automatically because names of JSON object properties matches with the name of Student class properties (case-insensitive).
POST Method with Mixed Parameters
Post action method can include primitive and complex type parameters. Consider the following example.
public class Student
{
    public int Id { get; set; }
    public string Name { get; set; }
}

public class StudentController : ApiController
{
    public Student Post(int age, Student student)
    {

    }
}
The above Post method includes both primitive and complex type parameters. So, by default, Web API will get the id parameter from the query string and the student parameter from the request body.
Following is a valid HTTP POST request in the fiddler for the above action method.

Parameter binding for Put and Patch method will be the same as Post method in Web API.
[FromUri] and [FromBody]
You have seen that by default Web API gets the value of a primitive parameter from the query string and a complex type parameter from the request body. But, what if we want to change this default behavior?
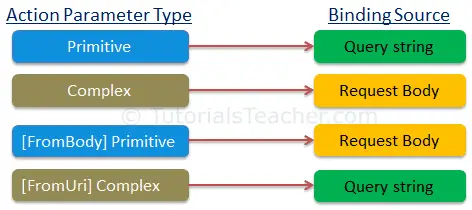
Use [FromUri] attribute to force Web API to get the value of complex type from the query string and [FromBody] attribute to get the value of primitive type from the request body, opposite to the default rules.
For example, consider the following Get method.
public class StudentController : ApiController
{
    public Student Get([FromUri] Student stud)
    {

    }
}
In the above example, Get method includes complex type parameter with [FromUri] attribute. So, Web API will try to get the value of Student type parameter from the query string. For example, if an HTTP GET request http://localhost:xxxx/api/student?id=1&name=steve then Web API will create Student object and set its id and name property values to the value of id and name query string.
In the same way, consider the following example of the Post method.
public class StudentController : ApiController
{
    public Student Post([FromUri]Student stud)
    {

    }
}
As you can see above, we have applied [FromUri] attribute with the Student parameter. Web API by default extracts the value of complex type from request body but here we have applied [FromUri] attribute. So now, Web API will extract the value of Student properties from the query string instead of request body.
The same way, apply [FromBody] attribute to get the value of primitive data type from the request body instead of query string, as shown below.
public class StudentController : ApiController
{
    public Student Post([FromBody]string name)
    {

    }
}
Following is a valid HTTP POST request in the fiddler for the above action method.

The following figure summarizes parameter binding rules.
Lesson 8. Action Method Return Type
The Web API action method can have following return types.
- Void
- Primitive type or Complex type
- HttpResponseMessage
- IHttpActionResult
Void
It's not necessary that all action methods must return something. It can have void return type.
For example, consider the following Delete action method that just deletes the student from the data source and returns nothing.
public class StudentController : ApiController
{
    public void Delete(int id)
    {
        DeleteStudentFromDB(id);
    }
}
As you can see above Delete action method returns void. It will send 204 "No Content" status code as a response when you send HTTP DELETE request as shown below.

Primitive or Complex Type
An action method can return primitive or other custom complex types as other normal methods.
Consider the following Get action methods.
public class Student
{
    public int Id { get; set; }
    public string Name { get; set; }
}

public class StudentController : ApiController
{
    public int GetId(string name)
    {
        int id = GetStudentId(name);

        return id;
    }

    public Student GetStudent(int id)
    {
        var student = GetStudentFromDB(id);

        return student;
    }
}
As you can see above, GetId action method returns an integer and GetStudent action method returns a Student type.
An HTTP GET request http://localhost:xxxx/api/student?name=john will return following response in Fiddler.

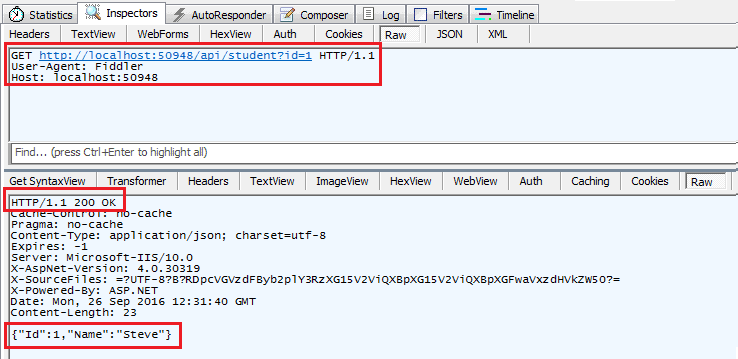
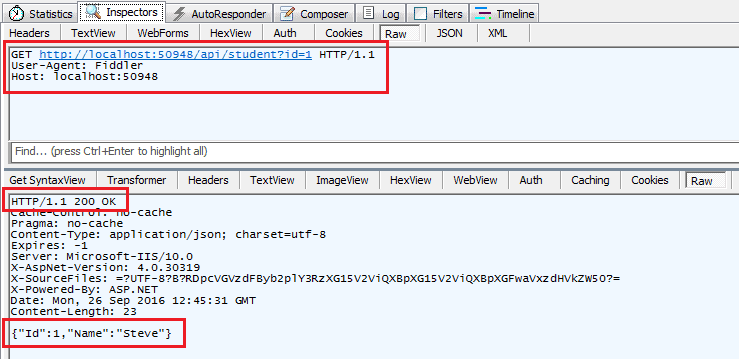
An HTTP GET request http://localhost:xxxx/api/student?id=1 will return following response in Fiddler.
HttpResponseMessage
Web API controller always returns an object of HttpResponseMessage to the hosting infrastructure. The following figure illustrates the overall Web API request/response pipeline.

Visit Web API HTTP Message Life Cycle Poster for more details.
As you can see in the above figure, the Web API controller returns the HttpResponseMessage object. You can also create and return an object of HttpResponseMessage directly from an action method.
The advantage of sending HttpResponseMessage from an action method is that you can configure a response your way. You can set the status code, content or error message (if any) as per your requirement.
public HttpResponseMessage Get(int id)
{
    Student stud = GetStudentFromDB(id);

    if (stud == null) {
        return Request.CreateResponse(HttpStatusCode.NotFound, id);
    }

    return Request.CreateResponse(HttpStatusCode.OK, stud);
}
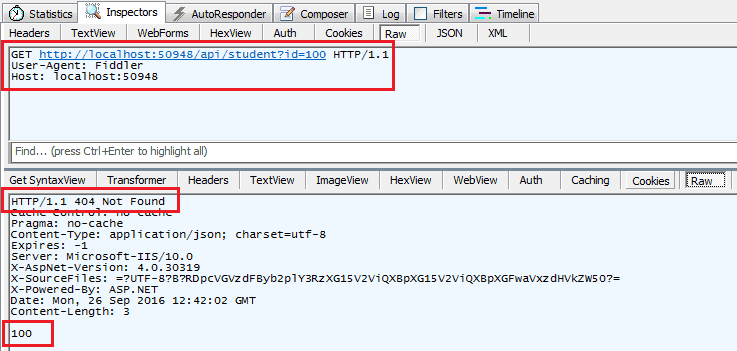
In the above action method, if there is no student with specified id in the DB then it will return HTTP 404 Not Found status code, otherwise it will return 200 OK status with student data.
For example, an http GET request http://localhost:xxxx/api/student?id=100 will get following response considering student with id=100 does not exists in the DB.
In the same way, an HTTP GET request http://localhost:60464/api/student?id=1 will get following response considering student with id=1 exists in the database .




No comments:
Post a Comment